DefendTek Tactical LED

| September 23, 2020
DefendTek DTM1C
Photo Credit: Keith Knoxsville
A Hen and a Drake Green Teal on the truck bed. Not a limit on anything, but a fun morning out.

The DefendTek Tactical LED, model DT-M1C, is a low cost 300 Lumen tactical flashlight that uses rechargeable batteries, and allows you to toggle a strobe setting.

While on a trip away from home, my girlfriend prevented a home invasion. I decided that we needed to immediately improve our home security, and defensibility. We have firearms ready to use at a moments notice, but the ideal situation would be some sort of warning, and the ability to see in the dark, or even dissuade home invaders.

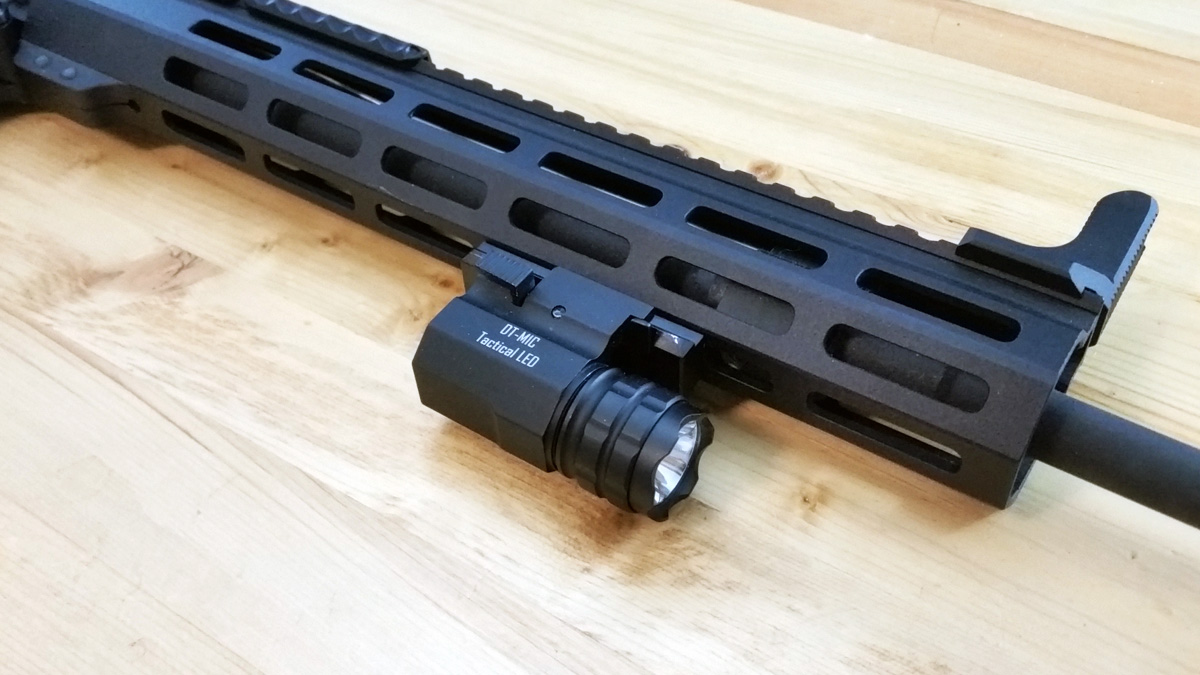
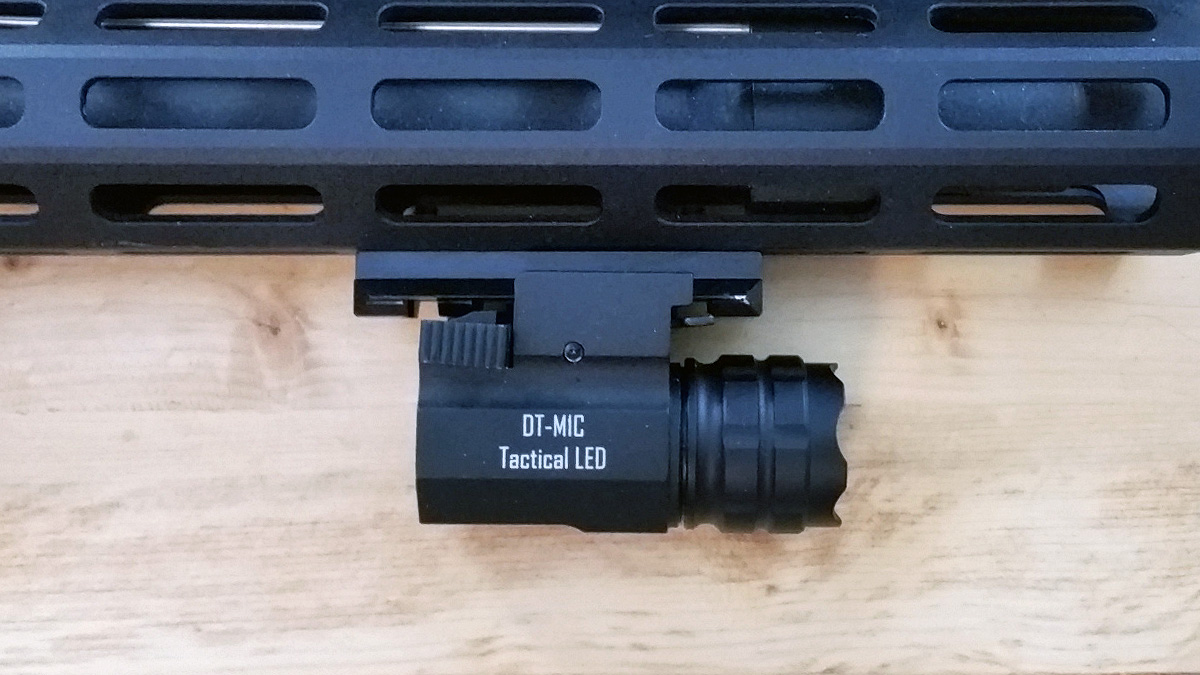
I got the DefendTek Tactical LED, model DT-M1C, because it is a compact tactical flashlight that fits on my Springfield XD, but can easily swap onto any picatinny rail, like the M-LOK rail on the underside of my AR15 NBS Free Float handguard. At $24.95 on Amazon, its a hard to argue against purchasing one.

Features Include:

  • The DefendTek Tactical LED, model DT-M1C, is a compact model.
  • Strong aluminum construction
  • 300 Lumen Cree LED
  • Strobe and Steady Light Modes
  • Easy to operate quick release
  • Uses 3v CR2 Rechargeable Batteries (Includes 1 non-rechargeable)

DefendTek DTM1C Side View

Pros:

  • Durable
  • Bright. I chose 300 Lumens, because any brighter, and it could blind the operator.
  • Strobe or Steady Modes, let you disorient a target or just illuminate a them.
  • QD rail mount design
  • Uses common CR2 Rechargeable Batteries
  • Low Price, great value, does not break the bank. Leaves you with money to buy additional batteries and a charger if you don’t have one already

Cons:

The option of steady or strobe modes is great. However, how you select the mode leaves a lot to be desired. Pushing a lever turns on the light in steady mode. Turning it off and then on again starts the strobe mode. You can not choose the mode separate from toggling the power. A better design would separate the functions.

Overall

Its a solid quality tactical light, with lots of features. There are some things to be desired, like mode of operation selection, however it can’t be beat for the price. The price point leaves you with room to buy additional CR2 batteries and a charger. I really wish DefendTek would update the light, because I’d happily buy the next generation with my minor gripe addressed.

Alarms

We also added a bunch of really simple, but effective door and window alarms. If you are interested, I use these, everywhere. If one goes off anytime it shouldn’t, then whatever caused an alarm to trip will be immediately met with a firearm carrying the DefendTek DT-M1C.

Tags: , , , , , , | Comments

Basic Reloading Equipment

| September 11, 2020
basic reloading eguipment
Photo Credit: Keith Knoxsville
A Hen and a Drake Green Teal on the truck bed. Not a limit on anything, but a fun morning out.

I’m going to cover the basic reloading equipment needed to get started reloading. I won’t go into heavy detail as to why you should or shouldn’t reload, but I’ll just speak to it briefly.

If you want to reload to save money, you probably won’t achieve your goal of saving money. It’s not true all the time, like with reloading premium hunting rounds or loading thousands of rounds on a multi-stage press, but most of the time, you won’t save money, you’ll just get to shoot more for the same amount of money. It usually takes a large volume and a long time for the average shooter to break even on equipment costs. The real benefits are ammo availability, custom load development, ammo security, and volume.

Now that I’ve briefly commented on why you might reload, I’ll dive right into the basic reloading equipment that you’ll need. Beyond the equipment, the most important things you can get are a mentor, reloading training, a reloading data book.

I’ll use the .223 Remington as a reloading equipment example since it’s in such high demand. However, dies, shell holders, and other equipment and consumables like gun powder, for 9mm, or other calibers are all similarly expensive. My reloading equipment list also assumes a single-stage press, where you only perform one reloading step at a time. It’s the cheapest method to start reloading your own ammo, but not ideal for loading tens of thousands of rounds of ammo.

Reloading Steps

I’ve broken down the functions of reloading equipment into the seven steps they perform.
1. Clean/Polish
2. De-prime/Resize
3. Clean/Polish
4. Prime
5. Powder Fill
6. Seat Bullet
7. Measure/Adjust/QC

Equipment List for .223 Remington

This is the equipment list that you will use forever, or until you upgrade to other presses. It excludes consumable equipment, and other consumables listed further below.

Consumable Equipment List

This is equipment that lasts a long time, but eventually needs replacement.

Consumables .223 Remington

  • Bullets
  • Brass(pick them up after you shoot them, and pick up other peoples cases)
  • Powder
  • Primers

Total Cost?

Basic reloading equipment, including a single die set is about $200 to $250 dollars. Other consumables are another $25 to $40. 100 bullets, 1lbs of powder, primers and brass, will set you back about $100. Some consumables are cheaper than others, and prices for things like primers are based on demand, and can be absurdly expensive or unavailable. And yes… 1lbs of powder will give you more mileage than 100 rounds, but thats where volumes start to come into play

At a minimum, expect to invest $325 to almost $400, to be able to do 4 25 round mag dumps of .233 out of your AR15. Or 10 mag dumps for restricted 10 round magazine states like California.

Caveats

Quality of brass, and bullet quality and materials will change you consumable pricing a lot. For example. 100 cheap jacketed lead 223 bullets can be bought for $12. Whereas a 50 lead free .223 bullets required in California for hunting costs about $30. My example assumed a middle ground. It wouldn’t be unreasonable to think you could get through 2 or 3 hundred rounds… on top of basic reloading equipment, for about $400.

Lastly, there is a lot of price gouging in todays market. High demand, and low supply means higher prices, and unscrupulous vendors willing to take your money in exchange for quelling your rational or irrational fears. Personally, I’d rather shoot less, and never support those people. Things will get better, and so will supply, but you can spend your money how you please.

Tags: , , , , , , | Comments

High Country Boil

| September 9, 2020
High Country Boil
Photo Credit: Keith Knoxsville
A Hen and a Drake Green Teal on the truck bed. Not a limit on anything, but a fun morning out.

A high country boil is exactly what it sounds like. Its a low country style boil, using invasive Signal crawfish, that are caught in the high country. The high country being the eastern side of the Sierra Nevada.

I won’t get too in the weeds on the differences in crawfish, because there ARE differences. Of the many species of crawfish, there are Red Swamp Crayfish(common in a low country boil), Virile or Northern, Ringed, Rusty, Shasta, and Signal.

In our part of the eastern sierra, Signal crayfish are invasive, they are also one of the largest species of crayfish. Unlike other crayfish in North America, many Signal crayfish have large claws, with claw meat, worth digging out.

Catching Crawfish

Catching crawfish is straight forward. I use traps like these, baited with chicken livers. I occasionally catch by hand, but am careful not to get pinched. I’m not sure you’d get injured, but also can’t imagine it would feel great to get pinched by a large Signal Crayfish.

Transporting Crawfish

I toss all my captured crayfish into a tote with a battery operated air bubbler, for transportation home.

Clean/Purging Crawfish

Once home, I transfer the crayfish into a bigger tote with a larger volume of cool de-chlorinated water. I de-chlorinate with an aquarium water de-chlorinator.

I let the crawfish sit in the tote for at least 24 hours, without food. Nobody wants to eat a poop vein full of black crud. 24 hours is the minimum to let a crawfish purge itself of waste. 36 to 48 hours is even better.

Worth mentioning is salt. Adding Epson salt, gives the mud bugs diarrhea, and can speed up the purging process. Some folks use table salt which may kill your crawfish. Giving crawfish ample time to purge, and not losing them to salting, seems to work best.

Cook/Boiling Crawfish

I bring a solution of water, lemon and salt, up to a boil, then drop the crawfish in. As soon as the water starts to boil again, I set a timer for 12 to 15 minutes.

At the same time I start the boil… I start another pot of brine. It includes bay leaves, pepper, salt, seasonings, lemons.

When the crawfish are done boiling, they get a quick rinse in cool water. The rinse will also remove any parasites that are still attached to the crawfish, all of which should die, fall off or get loose during the boil. After the rinse, I add the crawfish to a hot soak in the brine. They get brined for a few minutes, then plated for consumption.

My catch, clean, cook process, right or wrong, purges the crawfish, cleans them of any parasites, and them brines them for a great flavor. A big plate of Crawfish, is a great reward for catching an invasive species, and its simple to do.

Tags: , , , , , , , , , | Comments

Reload 12 Gauge Steel

| September 4, 2020
Reloading 12 Guage Steel
Photo Credit: Keith Knoxsville
A Hen and a Drake Green Teal on the truck bed. Not a limit on anything, but a fun morning out.

Want to reload 12 Gauge steel shot? Tired of not having the right ammo locally available? Living in California an dealing with ammo background BS? I got over it, and I’m happy to be able to produce any shot shell I want or need, at an economical price.

With California ammo background checks and associated costs, plus the lead free ammo cost compared to lead, as well as the lack of local availability, reloading hunting shot shells makes economical sense.

Equipment
12 Gauge Lee Load All 2 - $58.99 - $72.99

Consumables
10 Lbs. Steel #5 Shot – $19.99
200 Steel Shot Specific Wads – $20.12
200 Primers (x2 100 box) – (3.59*2) = $7.18
250 Overshot Cards 1/8″ – $5.03
1 Lbs. Shot Powder (Alliant Green Dot, Alliant Steel) – 23.99

Consumable Cost
$76.31 = 19.99 + 20.12 + 7.18 + 5.03 + 23.99

Total Cost = Equipment Cost + Consumable Cost
$135.30 = $58.99 + $76.31

You can expect to load 160 1 ounce loads, with the limiting factor being the steel shot. All the other supplies will load nearly double that amount of shells. If you can even get a hold of #5 steel, and its a decent hunting load. A box will probably cost between 12 and 17 bucks for 25 rounds. The above listed equipment will load 160 shells, or 6.4 boxes. Meaning you’ll probably break even on the consumables, and break completely even after your first 400 – 500 rounds.

All of the above doesn’t even consider the ammo background check costs, lack of availability of ammo, and any costs saved on trips to the sporting goods.

Its a winning deal just to avoid California’s asinine ammunition laws.

Tags: , , , , , , | Comments